How to Test COM Ports and Short Haul Modems
by Bruce Smith | Updated: 04/15/2021 | Comments: 2
Has an electrical surge or other event made you concerned that your COM port or short haul modem may not be operating properly? Do you know how to test for this? In this brief article, we’ll look at some simple tests you can perform to check your equipment and help ensure your data communication is functioning properly.
Getting Started
To perform these tests, you will need a terminal window. So, how do you get one of those? Prior to the release of Windows Vista, you could use HyperTerminal, a terminal emulation program that was included with Windows operating systems (OSs). If you have a newer OS, don’t worry. There’s an easy-to-use terminal window, compatible with all Windows OSs, in the Device Configuration Utility (DevConfig). DevConfig is a part of all Campbell Scientific data logger support software, and you can download a free, standalone version of DevConfig.
To use the DevConfig terminal window for testing communication, follow these steps:
- Install and open DevConfig.
- Select Unknown from the Device Type list.
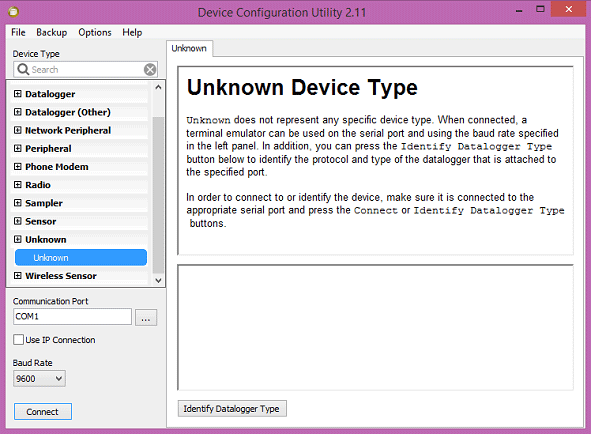
- In the Communication Port field, select the appropriate COM port.
- In the Baud Rate field, select 9600.
- Click the Connect button.
Testing a COM Port
To test if the computer COM port is functioning correctly, you can do a simple loopback test. (In a loopback test, a signal is sent from a device and returned, or looped back, to the device.) For this test, connect a serial cable to the COM port that you want to test. Then short pin 2 and pin 3 of the cable together.
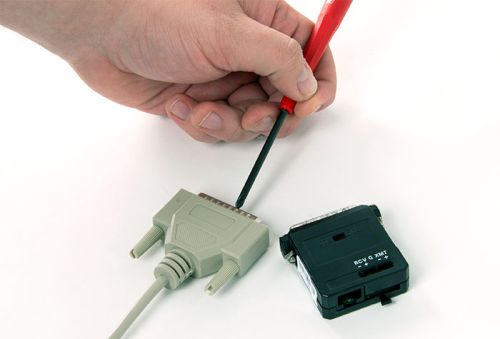
In the image below, a Phillips screwdriver is used to short pins 2 and 3 on a 9-pin serial cable. You can use something other than a Phillips screwdriver, as long as it is electrically conductive.

In the image below, a 25-pin serial cable is used for the loopback test.

Tip: Don’t let the screwdriver touch the shell of the cable. No damage will occur, but the loopback test will not work properly.
While pins 2 and 3 are shorted, use the computer keyboard to type some characters (letters and numbers). These characters should appear in the terminal window.
Note: The Echo Input checkbox should NOT be checked in the terminal window for this testing.
In the image below, the phrase “THE FIVE BOXING WIZARDS JUMPED QUICKLY 1234567890” was typed on the computer keyboard and appears in the terminal window.

If you remove the short (for example, by removing the screwdriver), any characters that you type on the computer keyboard should NOT appear in the terminal window.
|
If you used the short and the characters you typed on your computer keyboard did NOT appear in the terminal window, there is a problem with the computer’s COM port or the cable. Ensure that the serial cable is connected to the correct port and that no other program is also trying to use the COM port that you’re testing. |
Testing a Short Haul Modem
Short haul modems are vulnerable to damage from electrical surges that may be caused by lightning or other events. In fact, it’s interesting that the short haul modem connected to the computer is damaged much more frequently than the short haul modem connected to the data logger. To test the functionality of your modem, whether it’s usually connected to a computer or a data logger, you can perform a loopback test on it.
For many years, Campbell Scientific has sold the RAD-manufactured SRM-5A Short Haul Modem, which is used in the example images for this test.
To get started with this test, you will need to label the wires that are connected to your short haul modem and disconnect them.
Tip: Before you disconnect your wires from the short haul modem, make a note or take a picture of the connections so that you can easily reconnect the wires when you are finished with your testing. For example, if your wiring looks similar to the image below, you might make a small chart to indicate which wire goes where, like this:
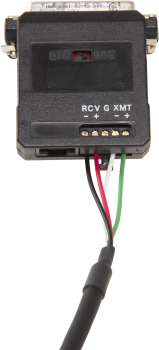
| Wire Color | Terminal |
|
Black |
RCV - |
|
Red |
RCV + |
|
White |
XMT - |
|
Green |
XMT + |
After you disconnect the wires from the modem, you can use bent paper clips to install two jumpers:
- A jumper from the RCV + terminal to the XMT + terminal
- A jumper from the RCV - terminal to the XMT - terminal
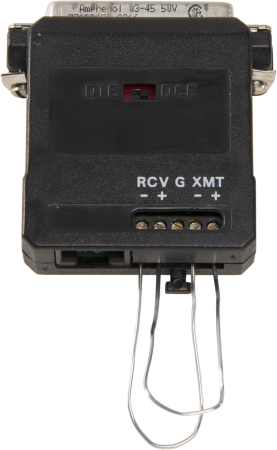
After the jumpers are in position, connect a serial cable from the COM port on the computer to the short haul modem. Use the computer keyboard to type some characters (letters and numbers). These characters should appear in the terminal window.
Note: The Echo Input checkbox should NOT be checked in the terminal window for this testing.
Tip: To be functioning correctly, the modem must return ALL letters and numbers correctly. (For example, if a single “A” is typed, a single “A” should be returned—not a different character or multiples of the letter “A.”) To test this, type each letter and number at least once. For the English language, one phrase that includes all of the letters in the alphabet and each number is THE FIVE BOXING WIZARDS JUMPED QUICKLY 1234567890.
In the image below, this phrase was typed on the computer keyboard and appears in the terminal window.

If all of the characters that you typed are returned as expected, the short haul modem is most likely functioning properly.
|
If any of the characters that you typed on your computer keyboard did NOT appear in the terminal window—or did not appear correctly—there is a problem with the short haul modem. Replace the short haul modem to restore communication. |
New Built-in Test Feature
With Device Configuration Utility version 2.26 and newer, there is a built-in Serial Port Test feature that can be used instead of the “Unknown” terminal testing. This Serial Port Test sends all the letters and numbers, freeing up your hands so you can hold the serial cable and the screwdriver.
To access this feature, open the Device Configuration Utility, click “Help” at the top, and select “Serial Port Test”:
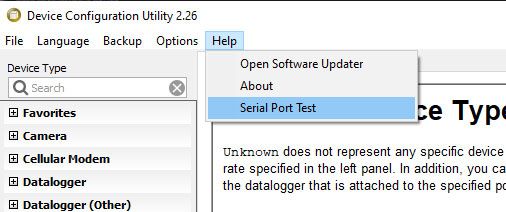
This screen provides instructions on performing the test, and you won't need to try to type letters while holding the screwdriver!

More Information
Hopefully these tests help you determine if your computer COM port and short haul modem are functioning properly. If you have any questions or tips regarding these tests, please share them below. If you need further assistance, please contact Campbell Scientific.


 Bruce Smith is a Technical Support Expert at Campbell Scientific, Inc. He provides technical support for many Campbell Scientific products and specializes in supporting weather stations used in the commercial irrigation industry. Bruce’s background is in building maintenance. Away from work, he enjoys spending time with his family and dogs, being outdoors, and tinkering with cars.
Comments
ET | 04/15/2021 at 01:26 PM
This Blog has been updated to include a new feature of Device Configuration Utility, "Serial Port Test". That will make testing a bit easier. :)
Karl | 06/15/2021 at 09:43 AM
Great article, another option for shorting pins 2 and 3 is a paper clip.
Please log in or register to comment.